Shopify integration (plugin / app)
Using VividWorks 3D product configurator on Shopify is as simple as adding our official Shopify app to your store. To actually use our Shopify app you must have a valid subscription with VividWorks and an active VividWorks 3D E-Commerce Configurator account. Our app can be found in the official Shopify app store. Installing and configuring our app to your store can be divided to four main steps, listed below.
- Installing the 3D product configurator app
- Activating the app
- Connecting a Vividworks account
- Configuring the app
Installing the 3D product configurator app
Installing the app from Shopify app store:
1. Find the app from Shopify app store
Head over to the Shopify app store and search for "VividWorks" from the app search

2. Add the app to your store
Click on the 'Install' button to select and add the app to your Shopify store

3. Install the app to your store
Click on the 'Install app' button to Install and add the app to your Shopify store

4. Done!
Congratulations, the VividWorks app is now installed! All you have to do now is activate it.
Activating the app
Activating our Shopify app is very simple.
1. Getting started
Click on the 'Subscribe now' button to get started on the subscription process

2. Choosing payment interval for subscription
Choose monthly or annual payment interval by clicking the subscribe button on either of them.

Note
The chosen payment interval can be changed once the subscription has been setup. This change can be done in 'My subscription' page.
3. Approving subscription
Choose a method of payment from the options presented. After the chosen payment method has successfully been input, the first charge can be approved by clicking the 'Approve' button.

Connecting a Vividworks account
The process of connecting a VividWorks account can be divided to two options, New account and Existing account.
New account
1. Choose Tenant name
Write your organizations name, in VividWorks terms, Tenant in the red text-input field. After writing, click on the 'Verify Tenant availability' button to make sure the name is available in our system.

2. Create Tenant
After verification of the Tenant name is done, a 'Create a new tenant' button appears. Click it to get forward.

3. Create a VividWorks account
Now you need to create a new VividWorks account. Click on the 'Sign up to VividWorks' button to open up a new page, follow the sign up process there and come back when the sign up is ready. Click on the 'Done signing up!' button to move on the next phase.

4. Verify account
The newly created account needs to be verified and that can be done on a separate page opened up by clicking the 'Get the verification code' button.

Note
If the opened up page does not show any code, close that page and click 'Get the verification code' button again.
5. Copy verification code
Verification code can be copied by clicking the icon in front of the code. After copying, go back to the previous page.

6. Verify access
Paste the copied code into the text-input field and click on the 'Verify access' button. A congratulory message appears on success.

7. Start Configuring
The 'Start Configuring!' button turns enabled when verification is successful. By clicking the button, you're all done!

8. Done
Congratulations, you have successfully created and connected a new VividWorks account! The picture below is what you should see now in your screen.

Existing account
1. Verify account
The system recognizes your store has an existing Tenant, enabling you to move straight into the verifying process. That can be done on a separate page opened up by clicking the 'Get the verification code' button.

Note
If the opened up page does not show any code, close that page and click 'Get the verification code' button again.
2. Copy verification code
Verification code can be copied by clicking the icon in front of the code. After copying, go back to the previous page.
3. Verify access
Paste the copied code into the text-input field and click on the 'Verify access' button. A congratulory message appears on success.
4. Start Configuring
The 'Start Configuring!' button turns enabled when verification is successful. By clicking the button, you're all done!
5. Done
Congratulations, you have successfully connected your VividWorks account! The picture below is what you should see now in your screen.
Configuring the app
Setting up our configurator is simple and straight forward, especially with our easy-to-follow instructions.
1. Create metafields
Defining metafields in your shop enables linking your Shopify products to our platform. These metafields act as coordinates to help locate your product in the VividWorks platform. With the metafields, we can show the correct configurator in your store.
Click on the 'Create metafields' button to create them and you will see a success message instead of the button.


2. Populate metafields
Note
Implementation of this phase depends on whether VividWorks has created the 3D configuration rules for your products or if you have created them independently.
The values needed for the metafields should be provided to you by VividWorks. You will be provided with a product specific Library ID and Product ID.
Exception If you are responsible for the ongoing maintenance of your 3D configuration, you can retrieve the required values (Library ID and Product ID) for the metafields from the Manager UI.
When you have received the provided ID's, paste them into their respective input-fields and select a product to update. These values should only be populated to the main product visible in your online catalog. There is no need to fill these values for the various modules and other parts of the product.
After you have done the previous steps, the 'Link the Product' button can be clicked and you will see a success message instead of the button.


3. Add configurator to your theme
Head to the Shopify's visual theme editor to add our configuration block right where you want it. After you're done, click the 'Mark this step done' button and you will see a success message instead of the button.


Note
The visual editor support is limited to "Online Store 2.0" themes. If you cannot find our block when editing the theme, your theme may not support custom AppBlocks.
4. Done
Congratulations, now your configurator should be up and running!
Shopify Cart Bundling
This functionality is implemented through Shopify's "cart-transform-extension".
Configuration in Shopify side
Configuring this feature to a specific store in Shopify requires access to the store's admin view. Two places needs to be accessed for the feature to be enabled, the setup page of our Shopify app and our app block within the theme editor.
Creating support for bundling
The setup page of our Shopify app has a tool for this feature. The tool defines a Bundle Target metafield and a cart transform object in your shop, supporting the bundling feature.
Click on the 'Enable bundling' button to create them and you will see a success message instead of the button.


Enabling bundling
Our app block within the theme editor has a 'Enable bundling' checkbox which determines the official state of this feature.

Bundle Target Metafield
This newly created metafield implements the parent for the bundle. Easiest way to achieve this, is to use Shopify's variant bulk editor. The bundle target metafield is not visible right away, but can be accessed through the column (see image below for example).
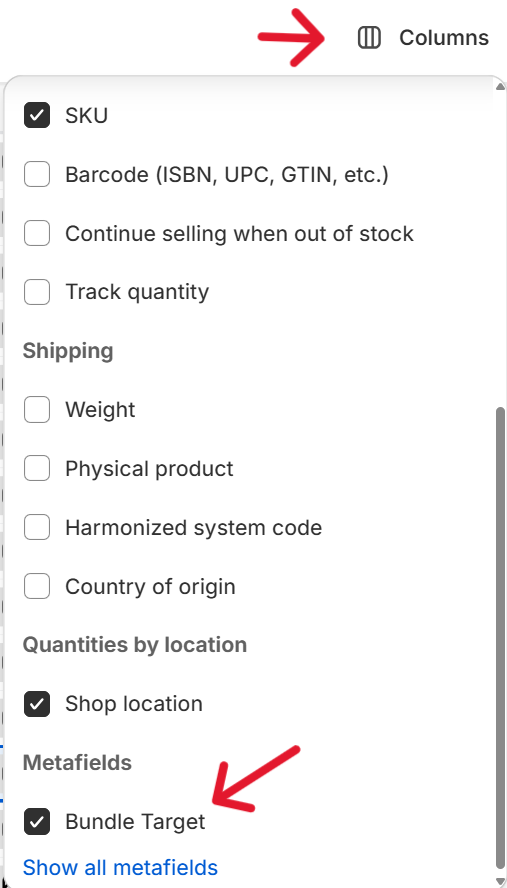
When the metafield column is accessed, it will open up a list of product variants and at least one has to be chosen. Preferably the container product variant.
Bundle "container" Product and Variant
A bundle container product and a variant is needed to configure this correctly. To create an "empty" product, go to create a new product.
- Name should be 'Bundle'. Because that will be the name the bundle is going to have in cart. So, whatever you name this product, will also be the name of all bundles in cart.
- Everything can be set to 0 (zero) or to disabled except Status, that needs to stay 'Active'.
- Choose to add a new variant, option name should be 'Details'. Because it will show up in cart as well.
- Option values should be 'Visible in summary or checkout'. Because it will show up in cart as well.
Image example of above = name, option and option values shown in cart.

With these instructions, bundling should work correctly.